Add
New Stock Item
Modify
Stock Item
Check
Out
Cancel
Sales
Add New Stock Item
This menu option adds a new stock item. It
is useful when there is new releases or a copy of the existing video arrives.
There is provision for storing the stock type, item name, quantity in
stock reorder level, purchase price, selling price, tax details etc. When the
user click the ‘Add new stock item’, a
window will appear for entering the item details as shown in Fig 74.
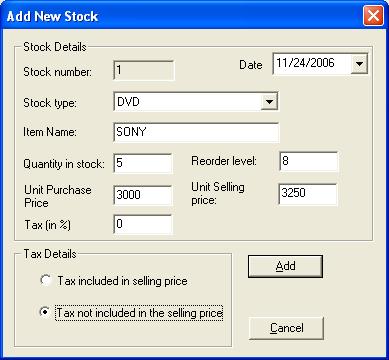
Fig74. Add New Stock
After entering all the entries, press the Add button and then a message box will appear asking
“Do you want to add another item to the stock”. If your answer is
Yes, then you can add another item
to the stock otherwise you can exit from this window.
Modify Stock Item
This menu can be used for modifying and deleting the stock details. Click on
this menu if you want to modify the stock type, item name, quantity, unit
price, reorder level etc. of a particular item or deleting an item. You can
print the renewed form immediately or later. When you click the ‘Modify stock
item’, the following window shown in Fig 75 appears.
![]()
Fig 75. To Select an Item
If you have selected an item from the above list, press the OK button to modify
and Cancel button to exit. If you press OK, then you will get next window which
is as shown in Fig76. This window has the provision for Modifying and Deleting
items.
If
you click the Save button, a message box will appear asking ‘Do You want to
save changes’. If you press Yes,
then the changes will be saved. Otherwise the window will be closed without
saving . If you do not want the item anymore, you could use the Delete. If you
make such a choice, then a message box will appear asking ‘ Are you sure you want to delete’. If your choice is Yes , then the item will be deleted. If you press
No , the item will not be deleted.
Think
twice before you delete because you cannot retain the data that are deleted.
You can click the Cancel button if you do
not want to delete or modify.
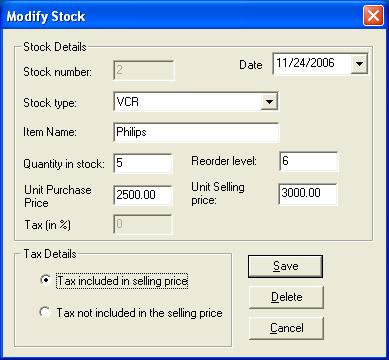
Figure 76. Modify Stock Item
Check Out
This menu allows you to sell the required items by your
customers. For selling items, select the items and specify the quantity. If
your customer does not want the selected item or if he wants another item, you
have the provision for deleting or adding before making the sale. To attract
your customers, you can add discount to the items. The window as shown in Fig
77 contains the details of items such as item name, stock type, quantity etc.
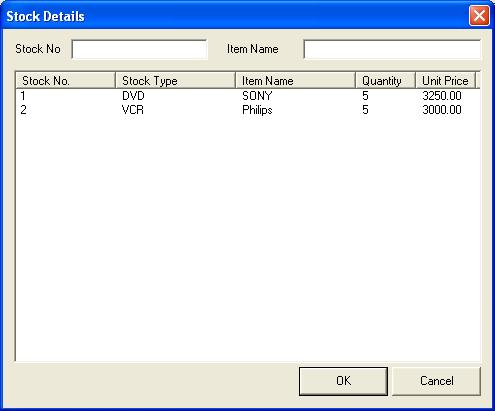
Figure 77. Item list
From
the above window, select an item and
press the OK button.
Then next window will appear as shown in Fig 78.
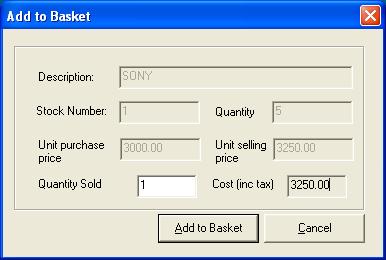
Fig78. Add to Basket
This window will help you to specify the number
of item your customer has selected ( ie Quantity sold). After this, if you
click Add to Basket ,
next window will appear
asking ‘Do you want any other items’. If
your answer is Yes,
then you can select another
item and if your answer is No, then
next window will appear with the items
that are added to the basket as shown in Fig 79.

Fig 79. Sales CheckOut
This window allows you to add /delete items according to your requirements. If
you press the Delete button, that item will be
deleted from the list, at the same time you can add new items to the list by
pressing the button labeled Add.You can specify the discount in the above
window before making the sale. Press Check
out button for getting the sales receipt.
If you do not want to make the
sale, click the Button labeled Cancel, then a
confirmation window will appear as ‘Are
you sure you want to cancel this dialog’. If you click the button labeled
Yes, then you will exit from this window and if
your option is No then window remains as shown
in Fig 79.
Cancel Sales
When the user click the Sales canceling menu, a window will appear for
entering the Bill No as shown in Fig 80.
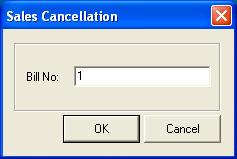
Fig 80. Sales canceling
If the user enters the
bill number and press OK, he will get a window as shown below. If the user
press the Cancel button, then the user will
exit from that dialog.
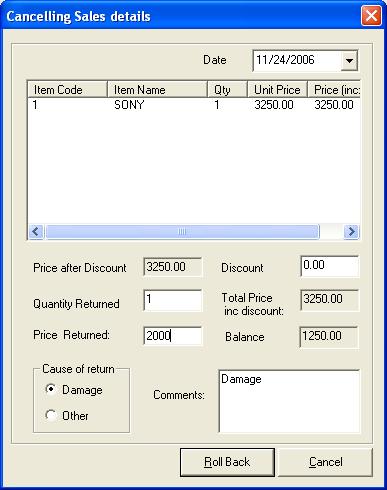
Fig 81 Sales canceling
dialog
If
the user enter the entries and press the Roll Back button, he will get a
message box asking ‘Are you sure you want to Roll Back the item ‘. If the
user presses Yes the item will be roll backed
(ie removed). If the user presses the No button,
the item will not be roll backed. If the user presses the Cancel button in the
above dialog, he will exit from the dialog.